> For the complete documentation index, see [llms.txt](https://docs.plura.io/ko/llms.txt). Markdown versions of documentation pages are available by appending `.md` to page URLs; this page is available as [Markdown](https://docs.plura.io/ko/agents/siem/uplc.md).
# PLC 사용자정의
PLURA Log Collector for User Defined
{% hint style="info" %}
사전 등록 및 점검 사항
* [관리 > 목록](https://docs.plura.io/ko/function/common/management/list) > 응용프로그램 태그 등록
* 수집할 응용프로그램 로그 경로 확인
{% endhint %}
**Logstash를 이용한 응용프로그램 로그 파싱**
* Logstash는 다양한 소스에서 데이터를 수집하고 변환하여 원하는 대상에 전송할 수 있는 경량 오픈 소스입니다. 주로 서버 측 데이터 처리 파이프라인으로 사용되며, 서버, 웹 서버 액세스, 응용프로그램, 정보보안 제품(방화벽, 웹방화벽 등)에서 비정형 데이터를 효율적으로 수집할 수 있습니다.
***
### 1. Logstash 설정 방법
1-1. Logstash 설치
설치 가이드
>
1-2. Conf 파일 다운로드
* 예시 응용프로그램: postfix
```sh
cd /etc/logstash/conf.d/
curl -O "https://raw.githubusercontent.com/QubitSecurity/Logstash/main/conf.d/70-postfix-plura.conf"
```
1-3. Postfix 로그 경로 수정
```sh
vi /etc/logstash/conf.d/70-postfix-plura.conf
```
>
```sh
mkdir /etc/logstash/patterns.d
cd /etc/logstash/patterns.d
curl -O "https://raw.githubusercontent.com/QubitSecurity/Logstash/main/patterns.d/grok-postfix"
```
### 2. PLURA-Agent를 이용하여 업로드 설정
{% hint style="info" %}
테스트 환경
* 원격지 서버(자식) : CentOS Linux release 7.9.2009 (Core), Postfix, Logstash 설치
* 로그 취합 서버(부모) : CentOS Linux release 7.9.2009 (Core), 라이선스 키 등록 및 실행
{% endhint %}
설치 가이드
>
2-1. Logstash가 설정된 원격지(자식) 서버 등록
2-2. 응용프로그램 서버 등록
* [**시스템** > **시스템 관리** ](https://docs.plura.io/ko/function/common/system/management)> 로그 취합서버(부모) 선택 > 응용프로그램 버튼 클릭
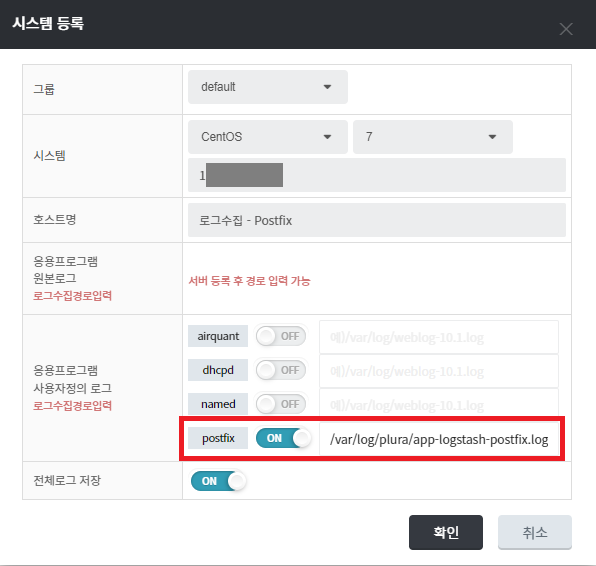
2-3. 호스트 등록 팝업 > 원격지(자식) 서버 정보 입력
* **응용프로그램 사용자정의 로그 수집 경로:** `/var/log/plura/app-logstash-postfix.log` 입력
2-4. Logstash 실행
* 시스템 관리에서 경로 설정 후 Logstash 실행
```
/usr/share/logstash/bin/logstash -f /etc/logstash/conf.d/70-postfix-plura.conf
```
### 3. PLURA 웹에서 확인
* 경로: [**전체로그** > **응용프로그램** > **사용자정의**](https://docs.plura.io/ko/function/common/flog/capp) > Postfix
* [**관리** > **사용**](https://docs.plura.io/ko/function/common/management/use) > 응용프로그램 > 사용자정의 설정이 ON 상태인 경우에만 메뉴가 노출됩니다.\[4]
* "수정" 버튼 클릭 후, Postfix 항목을 선택
* Postfix 로그가 생성되면 PLURA [**전체로그(응용프로그램)**](https://docs.plura.io/ko/function/common/flog/capp)에서 확인됩니다.
### 4. 참고 사이트
\[1] [**응용프로그램 로그 업로드 설정하기**](https://docs.plura.io/ko/faq/common/uploadapp)
\[2] [**Logstash 정의**](< https://aws.amazon.com/ko/opensearch-service/the-elk-stack/logstash/>)
## 동영상 안내
### 1. Postfix 영상
{% embed url="" %}
{% endembed %}