> For the complete documentation index, see [llms.txt](https://docs.plura.io/ja/llms.txt). Markdown versions of documentation pages are available by appending `.md` to page URLs; this page is available as [Markdown](https://docs.plura.io/ja/agents/siem/uplc.md).
# PLC ユーザー定義
PLURA Log Collector for User Defined
{% hint style="info" %}
事前登録及び点検事項
* 管理 > リスト > アプリケーションタグ登録
* 収集するアプリケーションログのパス確認
{% endhint %}
**Logstashを利用したアプリケーションログファッシング**
* Logstashは、様々なソースからデータを収集·切り替え、希望する対象に転送できる軽量のオープンソースで、主にサーバ側のデータ処理パイプラインとして使用できます。
* Logstashを使用すると、サーバ、Webサーバへのアクセス、**アプリケーション、情報セキュリティ製品(ファイアウォール、Webファイアウォールなど)**ログなど、さまざまなデータソースから非定型データを便利に収集できます。
***
## 1. Logstash設定方法
1-1. Install Logstash
Install Guide
>
1-2. Confファイルダウンロード
* アプリケーション例 : postfix
```sh
cd /etc/logstash/conf.d/
curl -O "https://raw.githubusercontent.com/QubitSecurity/Logstash/main/conf.d/70-postfix-plura.conf"
```
1-3. Postfix ログ 経路修正
```sh
vi /etc/logstash/conf.d/70-postfix-plura.conf
```
>
```sh
mkdir /etc/logstash/patterns.d
cd /etc/logstash/patterns.d
curl -O "https://raw.githubusercontent.com/QubitSecurity/Logstash/main/patterns.d/grok-postfix"
```
## 2. PLURA-Agentを利用してアップロード設定
{% hint style="info" %}
テスト環境
* リモートサーバー(子) : CentOS Linux release 7.9.2009 (Core), Postfix, Logstashインストール
* ログ取り込みサーバー(親) : CentOS Linux release 7.9.2009 (Core),ライセンス登録及び実行
{% endhint %}
Install Guide
>
2-1. Logstashが設定されたリモート(子)サーバー登録
2-2. アプリケーションサーバー登録
* システム > システム管理 > ログ取り込みサーバー(親)選択 > アプリケーションボタンをクリックします。
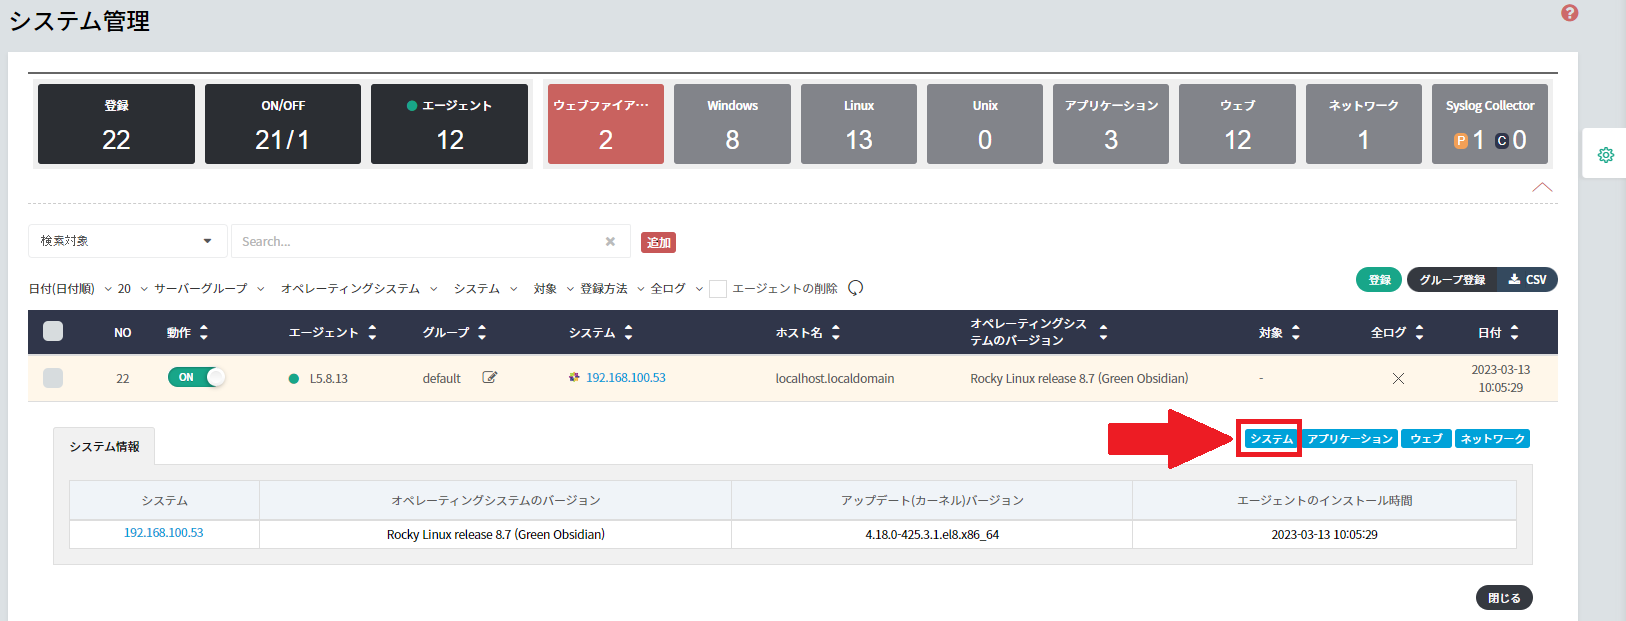 2-3. システム登録ポップアップ > リモート(子)サーバー情報入力
* アプリケーションのカスタマイズログ収集パスに“/var/log/plura/app-logstash-postfix.log”を入力します。
2-3. システム登録ポップアップ > リモート(子)サーバー情報入力
* アプリケーションのカスタマイズログ収集パスに“/var/log/plura/app-logstash-postfix.log”を入力します。
 2-4. Logstash実行
* システム管理でパス設定まで完了した後、Logstashを実行します。
```
/usr/share/logstash/bin/logstash -f /etc/logstash/conf.d/70-postfix-plura.conf
```
## 3. PLURA ウェブで確認
* パス : 全ログ > アプリケーション > カスタマイズ > postfix
* 管理 > 使用 > アプリケーション > カスタマイズ設定がON状態の場合、メニューが出ます。\[4]
2-4. Logstash実行
* システム管理でパス設定まで完了した後、Logstashを実行します。
```
/usr/share/logstash/bin/logstash -f /etc/logstash/conf.d/70-postfix-plura.conf
```
## 3. PLURA ウェブで確認
* パス : 全ログ > アプリケーション > カスタマイズ > postfix
* 管理 > 使用 > アプリケーション > カスタマイズ設定がON状態の場合、メニューが出ます。\[4]
 * "修正"ボタンをクリックした後、postfix項目を選択
 * Postfixログが生成されるとPLURA V5[全ログ(アプリケーション)](https://docs.plura.io/ja/function/common/flog/capp)で確認出来ます。
 ## 4. 参考サイト
\[1] [アプリケーションログアップロード設定](https://docs.plura.io/ja/faq/common/upload_setting)
\[2] [Logstash定義](https://aws.amazon.com/ko/opensearch-service/the-elk-stack/logstash/)
## 動画案内
### 1. Postfix 映像
{% embed url="" %}
{% endembed %}
## 4. 参考サイト
\[1] [アプリケーションログアップロード設定](https://docs.plura.io/ja/faq/common/upload_setting)
\[2] [Logstash定義](https://aws.amazon.com/ko/opensearch-service/the-elk-stack/logstash/)
## 動画案内
### 1. Postfix 映像
{% embed url="" %}
{% endembed %}