> For the complete documentation index, see [llms.txt](https://docs.plura.io/ko/llms.txt). Markdown versions of documentation pages are available by appending `.md` to page URLs; this page is available as [Markdown](https://docs.plura.io/ko/faq/siem/alarm/syslog-kiwi.md).
# Syslog 설정(Kiwi)
### 1. Kiwi 다운로드 및 설치
* 다운로드 URL:
### 2. Kiwi Syslog 실행
* 설치 완료 후 Kiwi Syslog를 실행하면 아래와 같은 화면이 나타납니다.
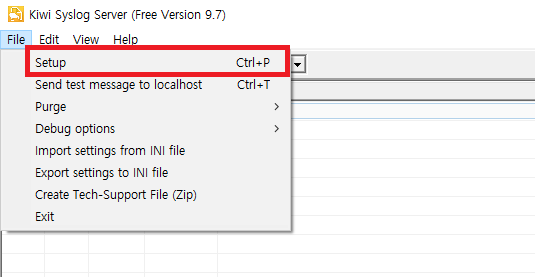
### 3. 단축키 실행
* 프로그램 상단에서 **File** → **Setup**을 클릭하거나, **Ctrl+P** 단축키를 사용하여 설정 창을 엽니다.
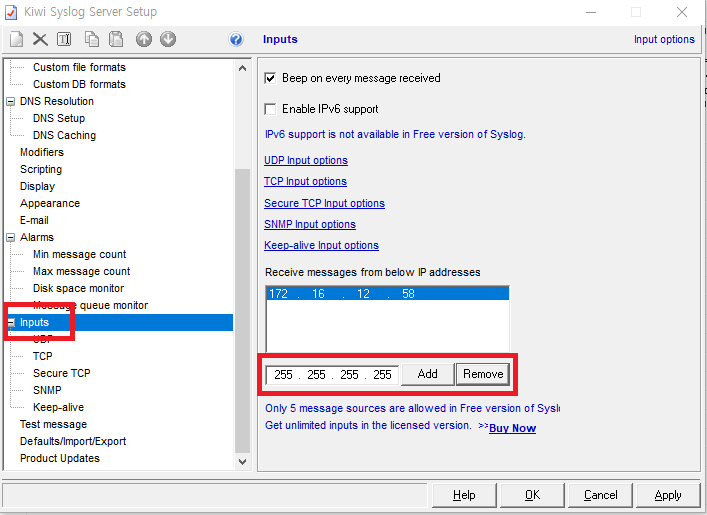
### 4. Source IP Address 추가
* **Inputs** 옵션에서 **Source IP Address**를 추가합니다.
### 5. 설정 추가
#### 5-1. \[송신] PLURA 설정
* PLURA 페이지 좌측 상단에서 [관리 > 연동 메뉴](https://docs.plura.io/ko/function/common/management/galam)로 이동하여 설정을 진행합니다.
* **수신지 IP 주소**를 입력합니다.
#### 5-2. \[수신] Kiwi Syslog 설정
* **Kiwi 메뉴** → **File** → **Setup** → **Inputs** → **UDP**로 이동하여 **Data encoding**을 **UTF-8**로 설정합니다.
* **Kiwi 메뉴** → **File** → **Setup** → **Inputs** → **IP addresses**로 이동하여 아래의 송신지 IP 주소들을 모두 추가합니다:
* 211.43.190.184
* 211.43.190.185
* 211.43.190.186
* 211.43.190.187
{% hint style="danger" %}
**주의:** 온프레미스 환경에서는 송신지 IP 주소가 다릅니다.
{% endhint %}